
Securing Devices
Secure Your Windows Devices
This only provides instructions on Windows updates on Windows computers. Your computer will have other programs that you need to set up for automatic updates such as Adobe, Java, and other browsers such as Google Chrome or Mozilla. You will also need to investigate your tablet and phone to learn how to protect it.
*** We are providing these instructions as a courtesy only. We cannot and will not provide any support beyond providing these written instructions. Do not call for technical support. ***
How to Turn on Windows Automatic Update for Windows 10:
https://support.microsoft.com/en-us/help/17154/windows-10-keep-your-pc-up-to-date
- Select the Start button, then select Settings > Update & security > Windows Update, and then select Change active hours.
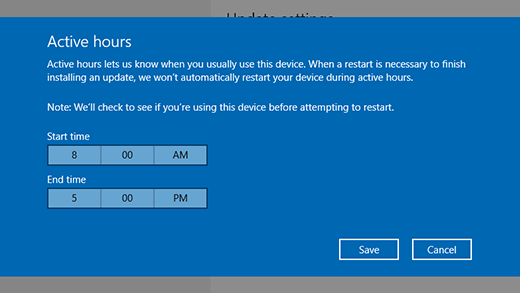
- Choose the start time and end time for active hours, and then select Save.
How to Turn on Microsoft Security Essentials (Anti-virus)
http://windows.microsoft.com/en-us/windows/getting-started-with-security-essentials
From Microsoft:
There’s not much to do. Microsoft Security Essentials works in the background to protect your PC. It checks for updates automatically a few times a day and doesn’t slow your PC down while it works.
Simple color-coding, simple actions
You can keep track of how your PC is doing by looking at the Microsoft Security Essentials icon in the notification area at the far right of the taskbar. Green means everything is okay, yellow means that your PC is potentially unprotected, and red means that your computer is at risk.
When you see yellow or red, click the icon and you will be able to see the details and take actions. Usually the best thing to do is to choose Clean computer so that the threat can be removed.
If you want to delete threats automatically whenever they are identified, open Microsoft Security Essentials, click the Settings tab and then choose Default actions.
Scanning right now
Open Microsoft Security Essentials and you’ll be on the Home tab. You can select a Quick scan or a Full scan (and then click Scan now).
The quick scan will look for viruses in all the places they are most likely to hide. It’s a good choice when you’re just checking on the health of your PC.
But if something makes you think your PC is infected with a virus or spyware, we recommend a full scan. Your computer will be a little slower while it is running, but the full scan looks everywhere for possible problems.
Scheduling scans
By default, Microsoft Security Essentials runs a scan of your PC once a week when you’re probably asleep (2:00 am on Sunday).
If you want to adjust this, open Microsoft Security Essentials and click the Settings tab. Under Scheduled scan, you’ll be able to change the day and time as well as the type of scan.
Scanning more than just your hard drive
It may be useful to scan external drives and USB drives since they can get infected too.
Open Microsoft Security Essentials and click the Settings tab. Go to Advanced and click the option to Scan removable drives. Whenever scans run, your removable drives will also be scanned (if they’re attached to your PC). If you want to run a scan right away, go back to the Home tab and click Scan now.
How to Turn on Windows Defender for Windows 10
To start Windows Defender, you have to open the Control panel and Windows Defender Settings and click on Turn On, and ensure that the following are enabled and set to On position:
- Real-time protection
- Cloud-based protection.
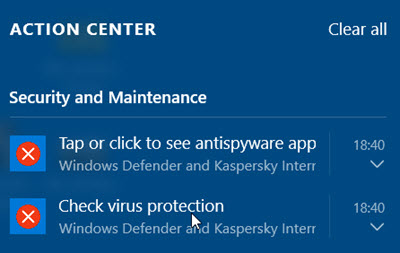
When there is no security software protecting your computer, you will see notifications like these appear.

Clicking on it will show you the installed security apps on your system. If you miss this notification, you can see it in the Notification & Action Center.
Clicking on it too will show you the installed security apps on your computer, as follows.
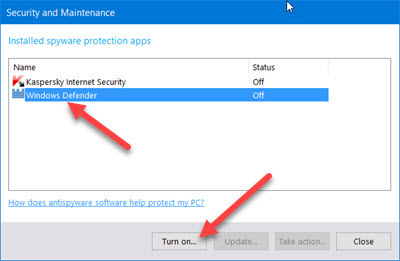
Select Windows Defender and then click on the Turn on button. Windows Defender will start. The first think you want to do when this happens, is to update your definitions.

Clicking on the Settings link in the top right corner will open the following panel. You can also access it via Settings > Update & security > Windows Defender.
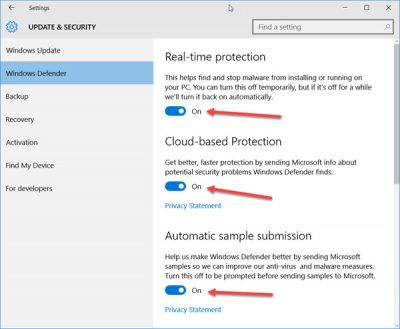
Once here, ensure that Real-time protection and Cloud-based protection is set to On. You may also set Automatic sample submission to the On position. You may then configure Windows Defender according to your needs.
Windows Firewall – Turn It On
Always, always turn on Windows Firewall.
Windows 10
To turn Windows Firewall on or off, select the Start button, open Windows Defender Security Center > Firewall & network protection, choose a network profile, and then under Windows Firewall, turn it on or off.
Backup Your Device
You need to plan ahead so that you can recover form attacks. Many attacks like ransomware ruin, corrupt, or lock the data on your computer. You can combat that by regularly taking backups of your machine. Use an external hard drive and/or a secure cloud service to do perform your backups. Many of these solutions require very little technical skill to use, but can save your important data.
Home Router
Take the time to understand your home router and use its firewall or security capabilities.
More from Microsoft
Please go to this page and read more tips guidance from Microsoft.
https://support.microsoft.com/en-us/help/17228/windows-protect-my-pc-from-viruses
https://support.microsoft.com/en-us/help/4013550/windows-protect-your-pc-from-ransomware
Additional Resource
https://staysafeonline.org/stay-safe-online/online-safety-basics/
Secure Your Android Devices
From TechRepublic: http://www.techrepublic.com/blog/10-things/10-security-measures-you-should-take-with-your-android-device/
1: Do use strong passwords
...For everything mobile. Every. Single. Thing. From your lockscreen to your email, to your app logins. No password should be simple to remember or enter. You've heard this countless times, but it always, always, always bears repeating. First, not having a lockscreen password shouldn't even be considered an option. Second, never use a simple password for this first line of defense. Ever. Make this password (PIN or pattern) as complicated as you can handle. The more complicated your password, the harder it will be for others to get to your data.
2: Do use two-factor authentication on everything possible
Google, Facebook, Amazon: They all offer two-factor authentication. Employing this on each service should not be an option. When these accounts get hacked, bad things happen. You can lose money, you can lose friends, you can lose information. Two-factor authentication can go a long way toward preventing this from happening—and it's not difficult to do. You'll definitely want to make use of the Google Authenticator or Authy to dole out the six-digit keys to get you into your accounts.
3: Do encrypt your device
Yes, your device performance will take a slight hit, but the added security is worth it. Once you've encrypted the device, you'll add an extra required password (during boot) that can't be circumvented. If you purchase a newer Android device (one that shipped with Marshmallow), you're already enjoying full device encryption. To find out if your device is encrypted, go to Settings | Security and look for the Encryption section. If it is listed as Encrypted, you're good to go.
4: Do use a password manager
You shouldn't allow any apps to save your password for you, unless the app is designed specifically for saving passwords. The last thing you want to do is have all your passwords cached on your mobile device. If you lose it (or it gets stolen), all those passwords are there for the taking. Instead of saving the passwords, use a solid password manager (like 1Password). Yes, this will be a bit of an inconvenience, but the added security will be well worth it.
5: Don't skip the updates
There's a reason why apps update, and it's not just for features. Apps update to fix security issues as well. If you don't bother to update those apps, you may leave yourself open to security flaws that could lead to terrible, horrible, no good, very bad... issues. You should always update your apps. The longer you wait, the longer your device stands vulnerable.
6: Do lock your apps
There are apps in the Google Play Store that allow you to secure other apps with passwords. This means you can choose which apps you want to password protect. Once protected, those apps can be opened only after entering the required password. No password, no entry. One of my favorite apps for this purpose is AppLock. It's reliable, easy to use, free, and does the job without adding so many bells and whistles as to complicate the process.
7: Do manage your app permissions
Thanks to Android Marshmallow, managing app permissions is finally in the hands of the end user. This means you can remove permission for an app to, say, access the device mic or camera. For example, you don't want Facebook to be able to use your location. You can now disable that particular feature from the app. To do this, go to Settings | Apps and then tap the gear icon and tap App Permissions. The system is straightforward and does a great job of empowering the user. Just make sure you don't disable permissions for system apps (which are hidden, by default, in the Permissions Manager window).
8: Don't use open Wi-Fi networks
If you're at a coffee shop and its wireless network is not password protected, don't use it—especially if you'll be transmitting sensitive information. If you find yourself faced with an open wireless situation, use your carrier network instead. If you have no choice, use one of the many VPN services available (such as TunnelBear VPN). When using an open network through a VPN connection your data will at least be encrypted and a bit more challenging to abscond with.
9: Don't install apps from a third party
You may be tempted to install that really cool sounding Android app from a third party. Don't. You never know whether that app might contain a dangerous piece of malware that could walk away with your sensitive information. Limit yourself to only installing from the Google Play Store. Even then, read the reviews of the app in question before installing. A few minutes of your time to check into an app (prior to installation) will be well worth the effort.
10: Do add your device with the Device Manager
Google has this handy tool called the Android Device Manager. Once your device is added, you can track it if it's lost—or even remotely wipe it, should you fear that your sensitive data could become compromised. To enable this feature, go to Settings | Google | Security and then tap to switch on both Remotely Locate This Device and Allow Remote Lock And Erase. You should do this immediately with your device. If you don't, and you lose your device, the Device Manager will do you no good.
Bonus tip: Do use the guest account feature
When handing over your device to another user (for whatever reason), make use of the guest account feature. If you pull down the notification shade (on Marshmallow, you must do this twice), you'll see a small icon representing your user account. Tap that icon and you can then add a guest user. Once added, when you hand that device over, tap the user icon to switch to the guest account. Making use of this system means the guest user can't access your data (unless they know your security password/PIN/pattern).
Secure Your iOS Devices
From COMPUTERWORLD http://www.computerworld.com/article/3047179/apple-ios/14-privacy-and-security-settings-every-ios-user-should-use.html
1: Alphanumeric passcodes
You probably already use a 4-digit passcode, but you can improve that with a 6-digit or alphanumeric code. You change this in Settings>Touch ID & Passcode, select Change Passcode and then tap the small Passcode Options dialog you’ll encounter. Alphanumeric codes are the toughest to decipher, so use one. You should also do yourself a favor and set up Touch ID.
2: Erase Data
At the bottom of the Settings>Touch ID & Passcode screen you’ll find the Erase Data toggle. Set this to green and all data on your iPhone will be erased after 10 failed passcode attempts.
3: Two-factor authentication
One of your most powerful protections, two-factor authentication means that when you enter your Apple ID and password for the first time on a new device, Apple will ask you to verify your identity with a six-digit verification code using one of your other devices. Manage this on your Apple ID account page.
4: Find My iPhone
Don’t be a loser – enable Apple’s Find My iPhone (Settings>iCloud>Find My iPhone) on all your devices. You should also enable Send Last Location in order that your iOS device will share the last place it was before battery life expires.
5: Location protection
Your iPhone automatically gather your favorite locations. This can be useful, but you can turn this feature off in Settings>Privacy>Location Services>System Services and then Frequent Locations, which you must turn off. You can erase data that may already have been gathered by tapping the Clear History button. You can also control which of Apple’s system services are tracking your location by taking a look at Settings>Privacy>Location Services>System Services. Here you can review those Apple apps that use your data and disable the ones you don’t use, but don’t disable Find My iPhone.
6: More location
Many apps request access to that data even when you’re not using them. You can review what permissions you’ve given to which apps in Settings>Privacy>Location Services, where you can assign location permission access to each app. Limiting access to this data may limit what some apps can do, but the trade-off is privacy – you can always change the setting when you want to use an app, and are you sure you wanted to share location data with an app you used just once?
7: Who gets your data?
Many apps seem demand access to personal data such as email, contacts of calendar information. Do you know why? Apps will ask for permission to use this information, but you can change and review how much access you provide to third party apps in Settings>Privacy and select which apps you trust enough to use this data.
8: Hard payments
Is it really too time-consuming to manually approve every purchase you might make on your iPhone? Protect yourself by choosing Always Require when a payment dialog appears.
9: Delete iMessages
Do you want your iMessages to be read by anyone who might break into your iPhone? No? Open Settings>Messages and in the Keep Messages section set 30-days, the shortest period Apple allows.
10: Lock screen
Previews of messages, notifications and emails can appear on your lock screen, meaning anyone in possession of your device can monitor these communications, even if they can’t get into your phone. Change this in Settings>Notifications>Messages and Mail. Maximize privacy by disabling Show Previews so your communications won’t appear on the lock screen.
11: Passcode free?
You can leave Today, Notifications View, Siri, Reply with Message, Wallet visible and (to a point) accessible on your lockscreen, but you can disable this for each of these in Settings>Touch ID & Passcode.
12: Safari privacy
Ads networks want your data. Not only do they want this to sell you stuff, but they also try to make dollars selling demographic information about you to advertisers. Control what you share in Settings>Privacy>Advertising and enable the Limit Ad Tracking toggle. You should then tap the Reset Advertising Identifier tool to anonymize yourself. And avoid using Google services.
13: Use DuckDuckGo
Change your search engine to DuckDuckGo in Settings>Safari>Search Engine, because the search engine doesn’t collect information about you.
14: Auto-lock
Lower the auto-lock time to 30-seconds in Settings>General>Auto-Lock.